Single Sign-On (SSO)
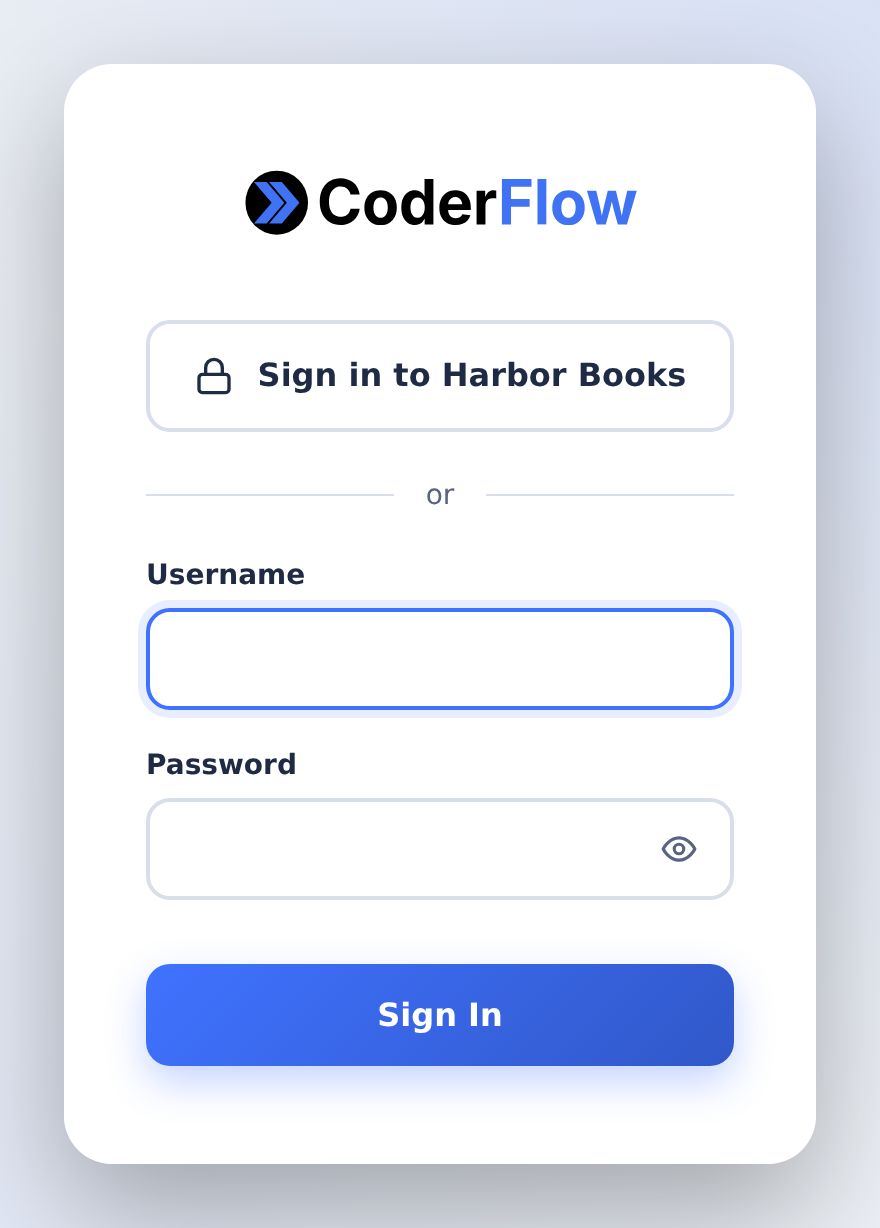
CoderFlow supports Single Sign-On via OpenID Connect (OIDC), allowing users to authenticate with your organization's identity provider.
Overview
SSO provides:
- Centralized authentication — Users log in with existing corporate credentials
- Automatic user provisioning — New users are created on first login
- Security compliance — Leverage your IdP's MFA, conditional access, and audit logging
CoderFlow works with any OIDC-compliant identity provider, including Microsoft Entra ID, Okta, Google Workspace, and Auth0.
VS Code Extension
When SSO is enabled, the VS Code extension profile manager shows a Sign in with SSO option. The extension opens a browser window to complete the SSO flow, then exchanges the approved session for an API key to store in the profile. This works even if local username/password login is disabled; in that case, use it instead of the username and password fields, which the server refuses (see SSO-Only Mode).
CLI SSO Login
The CLI uses an OIDC device-style login flow:
coder login --sso
The command checks the server's public OIDC configuration, asks the server for a device code, displays the user code, and opens the browser when possible. After the user completes SSO in the browser, the CLI polls the server until approval is complete. The server then returns a personal API key, and the CLI stores that key in the active profile.
When local login is disabled, coder login without --sso is refused with a message that points to coder login --sso.
This means CLI and extension requests still authenticate with API keys after SSO completes. The key has no separate scope; it receives the same permissions as the user account through roles and access bindings. See API Keys and Permissions.
Configuration Methods
SSO can be configured in two ways:
- Web UI — Configure through the Settings page (recommended)
- Configuration file — Edit
oidc.jsondirectly in the server data directory
Both methods produce the same result. The Web UI is recommended for most users as it provides validation and a guided setup experience.
Configuring via Web UI
- Navigate to Server Settings → Authentication → SSO Connection
- Configure the SSO Connection tab:
- Enable SSO
- Select your identity provider (or Custom for other providers)
- Enter your Client ID, Client Secret, and Issuer URL
- Use Test Connection to verify your settings
- Configure the SSO Provisioning tab:
- Turn auto-provisioning on or off with the Auto-provision users switch
- Set the default access for new users
- Choose whether to allow local login (username and password sign-in in the browser, the CLI and VS Code) alongside SSO
- Click Save to save and apply changes immediately
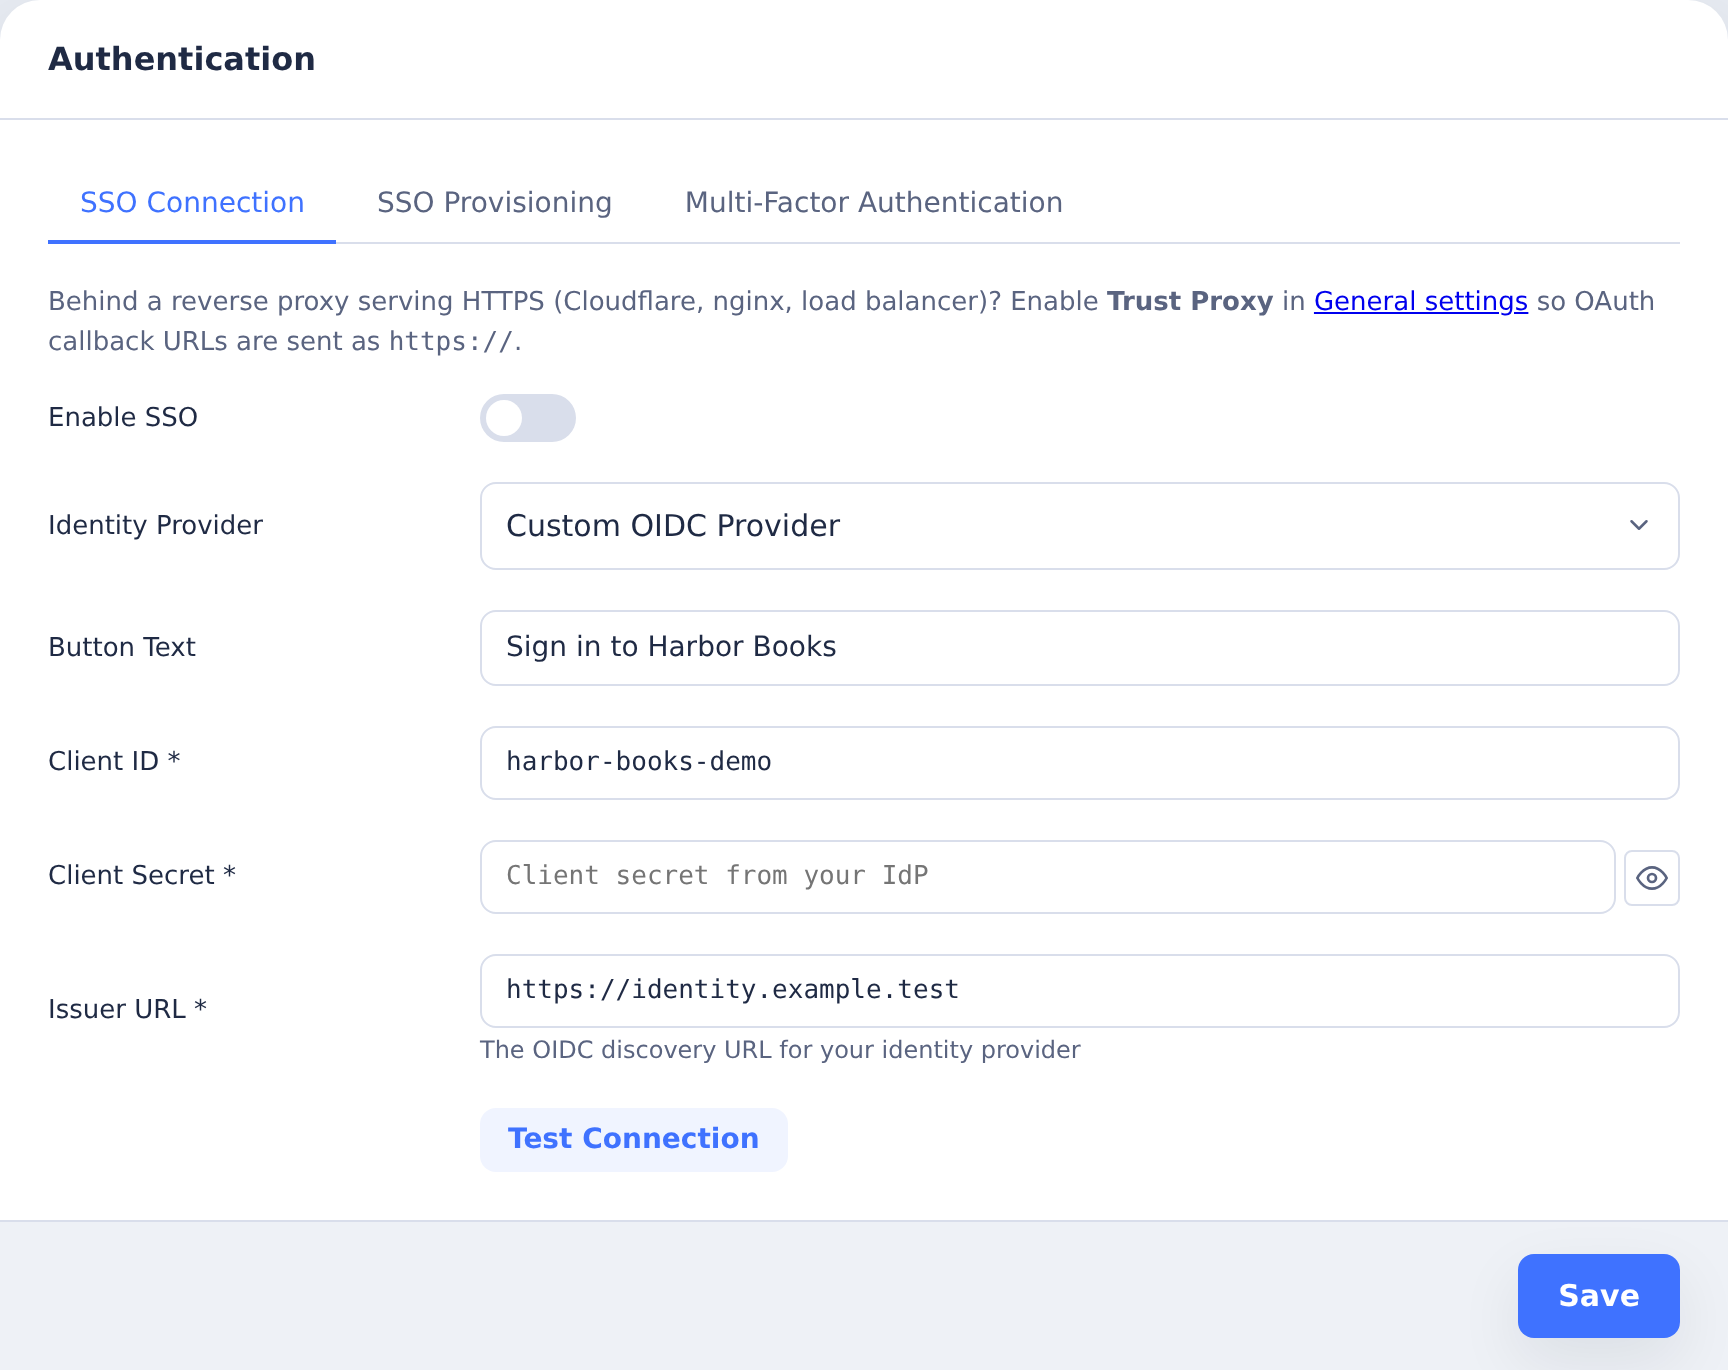
Enter the client and issuer values from your identity provider.
Configuring via File
Create an oidc.json file in the server data directory: the directory set by SERVER_DATA_PATH, or ~/.coder/data for the server's operating-system user when no override is set.
{
  "enabled": true,
  "display_name": "Sign in with Microsoft",
  "client_id": "your-client-id",
  "client_secret": "your-client-secret",
  "issuer": "https://login.microsoftonline.com/{tenant-id}/v2.0",
  "scopes": ["openid", "profile", "email"],
  "auto_provision": true,
  "default_role": "developer",
  "allow_local_auth": true
}
After saving the file, restart CoderFlow or use the Web UI to reload the configuration.
Security Note:
oidc.jsonis stored in the server data directory, outside the setup repository. It contains the client secret whenclient_secretis set; CoderFlow stores it encrypted with the server's key, and a secret typed into the file by hand is encrypted the next time the SSO settings are saved or the server starts. The other settings stay readable and can be edited by hand. If you useclient_secret_fileinstead, a relative filename is resolved under.secrets/in that same data directory; an absolute path is used as given, and the file is read as it is. Keep the configuration and any secret file private and out of version control. If the server's key is lost, SSO sign-in stops until it is restored; see Lost server key.
Configuration Reference
| Option | Required | Default | Description |
|---|---|---|---|
enabled | Yes | — | Set to true to enable SSO |
display_name | No | "Sign in with SSO" | Text displayed on the SSO button |
client_id | Yes | — | Application/client ID from your identity provider |
client_secret | Yes, unless client_secret_file is set | — | Client secret from your identity provider |
client_secret_file | No | — | File that holds the client secret, used when client_secret is not set. A relative filename is resolved under .secrets/ in the server data directory; an absolute path is used as given |
issuer | Yes | — | OIDC issuer URL (used for discovery) |
scopes | No | ["openid", "profile", "email"] | OAuth scopes to request |
auto_provision | No | true | Automatically create users on first SSO login |
default_role | No | "developer" | Access binding assigned to auto-provisioned users. Supported values: viewer, developer, environment_admin, server_admin. Legacy values manager and admin are also accepted. |
allow_local_auth | No | true | Allow username and password sign-in alongside SSO. When false and SSO is enabled, the server refuses every password sign-in (see SSO-Only Mode) |
Microsoft Entra ID Setup
1. Create App Registration
- Go to Azure Portal
- Navigate to Microsoft Entra ID > App registrations > New registration
- Configure the registration:
- Name:
CoderFlow(or your preferred name) - Supported account types: Single tenant (recommended for enterprise)
- Redirect URI: Select Web and enter
https://{your-coderflow-host}/auth/oidc/callback
- Name:
- Click Register
- Note the Application (client) ID and Directory (tenant) ID from the Overview page
2. Create Client Secret
- In your app registration, go to Certificates & secrets
- Click New client secret
- Add a description and select an expiration period
- Click Add
- Copy the secret Value immediately (it won't be shown again)
3. Configure CoderFlow
Via Web UI:
- Go to Server Settings → Authentication → SSO Connection
- Select Microsoft Entra ID (Azure AD) as the provider
- Enter your Client ID and Client Secret
- Replace
{tenant-id}in the Issuer URL with your Directory (tenant) ID - Click Save
Via configuration file:
Create oidc.json in the server data directory described above:
{
  "enabled": true,
  "display_name": "Sign in with Microsoft",
  "client_id": "{your-application-client-id}",
  "client_secret": "{your-client-secret-value}",
  "issuer": "https://login.microsoftonline.com/{your-tenant-id}/v2.0",
  "scopes": ["openid", "profile", "email"],
  "auto_provision": true,
  "default_role": "developer",
  "allow_local_auth": true
}
Other Identity Providers
Okta
Issuer URL: https://{your-okta-domain}/oauth2/default
In Okta Admin Console:
- Create a new Web application
- Set the redirect URI to
https://{your-coderflow-host}/auth/oidc/callback - Copy the Client ID and Client Secret
Google Workspace
Issuer URL: https://accounts.google.com
In Google Cloud Console:
- Create OAuth 2.0 credentials (Web application type)
- Add
https://{your-coderflow-host}/auth/oidc/callbackto authorized redirect URIs - Copy the Client ID and Client Secret
Generic OIDC Provider
For other OIDC-compliant providers, you need:
- Issuer URL: Must support OIDC discovery (
.well-known/openid-configuration) - Client ID and Secret: From your provider's application registration
- Redirect URI:
https://{your-coderflow-host}/auth/oidc/callback
User Provisioning
Auto-Provisioning Enabled (Default)
When auto-provisioning is enabled, CoderFlow automatically creates a user account on first SSO login:
- Username: Derived from email (e.g.,
john.doe@company.combecomesjohndoe) - Email: From the identity provider's claims
- Name: From the identity provider's claims
- Access: A direct access binding is created from the configured
default_role(defaults todeveloper)
Environment roles are bound to all environments. Server Admin is bound at the server level.
Existing SSO users created before default access assignment was available are not changed automatically. Update those users from People & Access > Access if they need the current default access.
Auto-Provisioning Disabled
When auto-provisioning is disabled, users must be created in CoderFlow before they can log in via SSO. Create users with matching email addresses:
coder-server create-user --username=johndoe --email=john.doe@company.com --name="John Doe" --role=developer
SSO login will fail with "user not found" if no matching user exists.
Updating User Information
When an existing user logs in via SSO, CoderFlow updates their display name if it changed in the identity provider. Other fields (username, role, permissions) are managed within CoderFlow.
For details on how default access becomes concrete roles and bindings, see Permissions.
SSO-Only Mode
To require SSO, turn off Allow local login on the SSO Provisioning tab, or set allow_local_auth to false in oidc.json. While SSO is enabled and local login is off, the server refuses every username and password sign-in, for every account, Server Admins included:
- the browser sign-in page, which the Portal, the Outlook add-in and MCP clients also open; it hides the username and password form;
coder loginwithout--sso;- the username and password fields in the VS Code extension.
A refused sign-in answers with a message that points to SSO and to coder login --sso; the password is not checked. An authenticator-code step that started before local login was turned off cannot be completed afterwards; the user signs in again with SSO.
What keeps working:
- SSO in the browser,
coder login --ssoand Sign in with SSO in VS Code. - Sessions and API keys that already exist. Turning off local login does not sign anyone out.
- One-time login links and the first administrator's setup link, which an administrator creates on the server (see Recovering Access). An administrator created through the setup link signs in with SSO afterwards, using the same email address.
When the change takes effect:
- Save on the settings page applies it at once.
- A change made by editing
oidc.jsonapplies when CoderFlow restarts or the configuration is reloaded from the Web UI. - If SSO is enabled and local login is off but the rest of the SSO configuration cannot be loaded, password sign-in stays refused. If
oidc.jsonexists but cannot be read or is not valid JSON, password sign-in is also refused. In both cases the server log says why at startup; fix the file as described below.
Refused sign-ins are written to the server log as auth.login.failure security events with reason sso_only, at most one per source address per minute (see Server Logs).
A CoderFlow App Server that runs inside a CoderFlow task container, for example while testing CoderFlow itself, does not apply SSO-only. It decides this from its own runtime, never from anything in a request, and it is opened through the host server's task proxy, which requires a CoderFlow sign-in.
Important: Before turning off local login, check that at least one Server Admin can sign in with SSO.
Recovering Access
If nobody can sign in with SSO (for example, the identity provider is down or misconfigured), recovery needs access to the server itself. There is no password exception for any account. Run these commands as the operating-system user that runs CoderFlow, so they use the same server data directory.
Allow local login again. Edit oidc.json in the server data directory (the directory set by SERVER_DATA_PATH, or ~/.coder/data for the server's operating-system user when no override is set). Set "allow_local_auth": true, or set "enabled": false to turn SSO off, and restart CoderFlow:
coder-server restart
Password sign-in works again for accounts that have a password. When SSO works again, turn Allow local login off from the settings page.
Or use a one-time login link. A login link signs one user in to the browser even while local login is off. Login links are disabled by default; turning them on needs a restart:
coder-server config set login_links_enabled true
coder-server restart
coder-server create-login-link --username=<admin-username>
Open the printed link in a browser. Each link works once, expires after 20 minutes unless --ttl=<minutes> (up to 60) is given, and the session it opens lasts at most an hour. Every redemption is logged as a security event. Set site_url first so the printed link has the right address (see Installation). When you are done, turn login links off again with coder-server config set login_links_enabled false and restart.
Removing SSO
To disable SSO:
Via Web UI:
- Go to Server Settings → Authentication → SSO Connection
- Click Remove SSO
Via file:
Delete the oidc.json file from the server data directory and restart CoderFlow.
Troubleshooting
"Redirect URI mismatch" Error
The redirect URI in your identity provider must exactly match CoderFlow's callback URL:
https://{your-host}/auth/oidc/callback
Common issues:
- HTTP vs HTTPS mismatch
- Missing or extra trailing slash
- Wrong port number
- Hostname mismatch (e.g.,
localhostvs127.0.0.1)
"Invalid or expired state" Error
This occurs when:
- The login took too long (over 10 minutes)
- The user refreshed the page during login
- Browser cookies are blocked
Solution: Return to the login page and try again.
"User not found" Error
This appears when auto-provisioning is disabled and no user with the SSO email exists in CoderFlow. Either:
- Enable auto-provisioning, or
- Create the user manually with the correct email address
"Missing email claim" Error
The identity provider isn't returning the user's email. Ensure:
- The
emailscope is included in your configuration - The user has an email address in the identity provider
- The app registration has permission to read email (check API permissions in Azure)
SSO Button Not Appearing
Verify that:
- SSO is enabled in the configuration
- The server has loaded the configuration (check server logs)
- Use Test Connection in the Web UI to verify the issuer URL is accessible