Files & Editing
CoderFlow has three code-editing surfaces. They all start from the same task result, but they are useful at different points in the review flow.
| Surface | Where it runs | Best for |
|---|---|---|
| Quick Edit | The task page, inside the running task container | Small edits to a file you are already reviewing |
| Web VS Code | code-server in the running task container | Full IDE work in the browser, terminal commands, and multi-file edits |
| VS Code Extension | Your local desktop VS Code workspace | Applying completed task patches to local repositories |
This page covers Quick Edit, the changed-files view, and the task file browser. For the full browser IDE, see Web VS Code. For local desktop VS Code, see VS Code Extension.
Viewing Changed Files
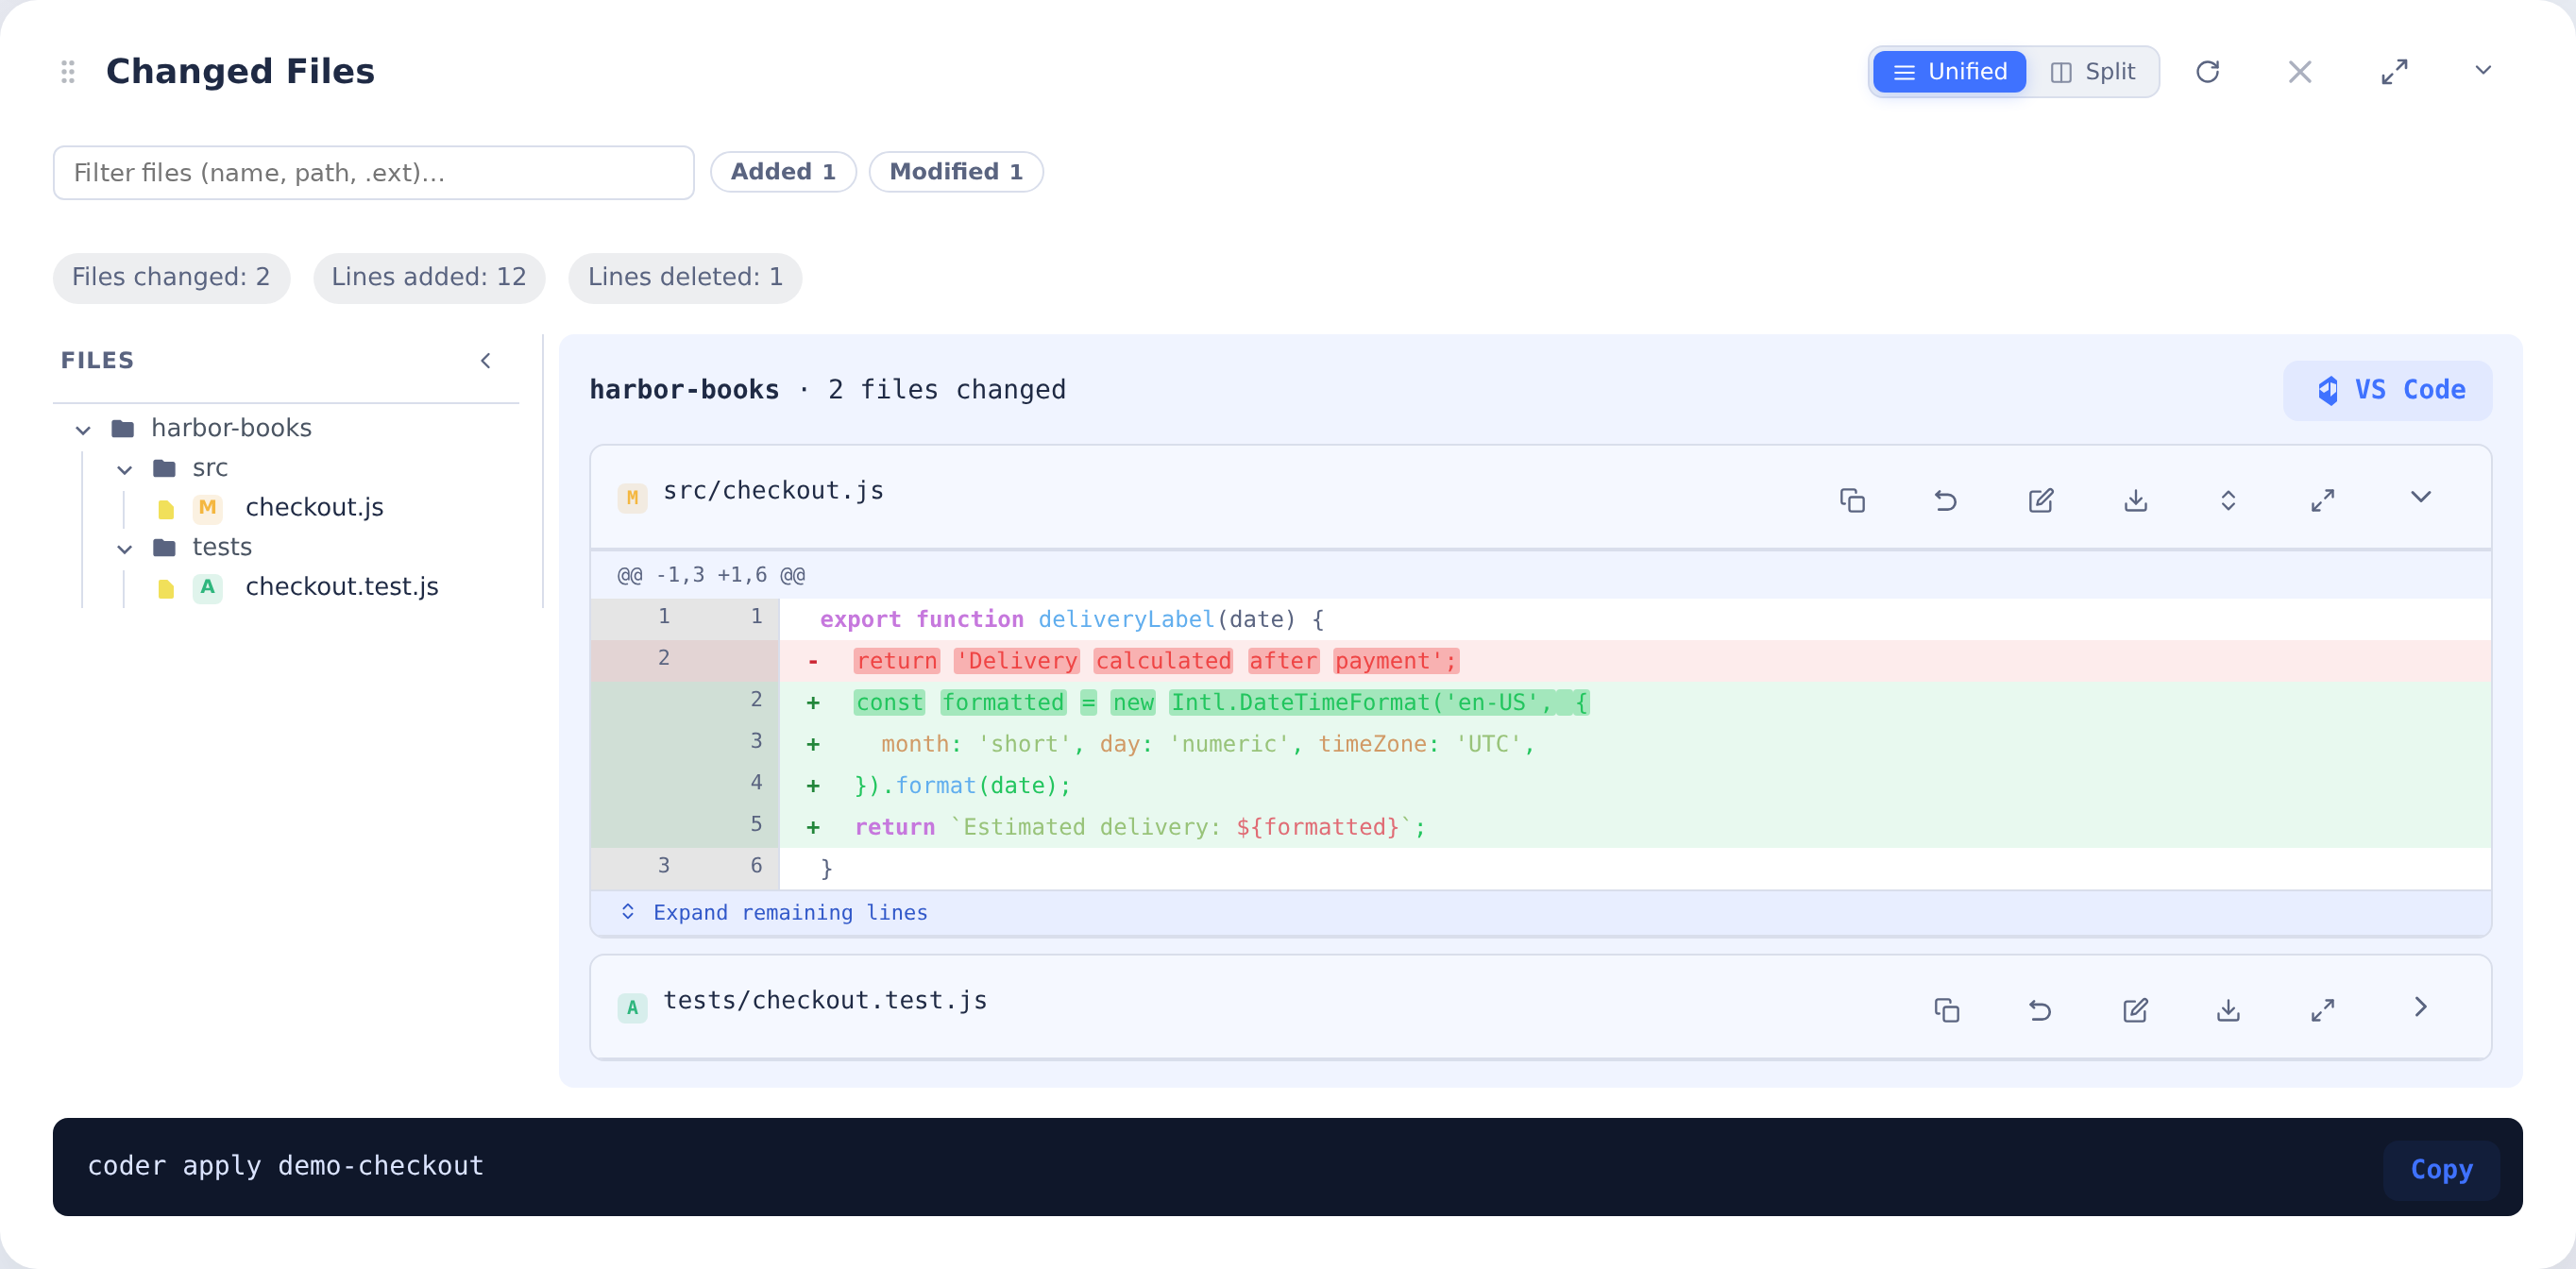
The Changed Files section displays all repository changes made during the task execution. When a task completes or when you view an active task, you'll see:
- Change statistics - Count of repositories, files changed, lines added, and lines deleted
- Repository list - Each modified repository with the number of files changed
- File diffs - Detailed diffs showing what changed in each file, with syntax highlighting, in your choice of Unified or Split view
You can toggle each file's diff to expand or collapse it. The diffs are read-only and show the state of the repository at the moment the task finished syncing.
While the container is running, each changed file also includes a Download action so you can save the current file contents directly from the task view. Deleted files do not show this action.
Filtering the File List
On tasks with many changed files, a filter toolbar appears above the file list:
- Filter changed files - Type in the filter box to narrow files by name, path, or extension. Multiple terms must all match, and
*works as a wildcard (e.g.,*.rpgle) - Quick-filter chips - Toggle Added, Modified, or Deleted files, each showing its count. Multi-repository tasks also get one chip per repository
- Clear - Resets all active filters
Filters narrow the file tree and the diff list together, and a N of M files count shows how much is hidden.
Expanding Diff Context
Diffs are compact by default, showing only changed hunks with a few surrounding lines. To see more:
- Click the expander bars between and around hunks to reveal the hidden unchanged lines in place. This works in both Unified and Split views.
- Click the Full toggle in a file's header to expand the entire file at once. Click it again to collapse back to the compact diff. The toggle only appears when the file has hidden lines.
When a file is maximized to full screen, a per-file Unified / Split toggle appears in its header so you can switch view modes without leaving the maximized view. Press Escape to exit.
IBM i Changes
For tasks created by Import IBM i Sources, an IBM i Changes panel in the Changed Files section summarizes the change set in IBM i terms: the source libraries involved, the changed Source members, and the changed Objects (build rules), each tagged Added, Modified, or Deleted. The filter toolbar narrows these lists too.
When an IBM i Import automation created the task, the panel opens with the same summary as the run's row in automation run history, including its verdict, the rules each build rules profile added, changed, or left unchanged, and the objects that got no new or updated rule. Objects (build rules) lists the objects whose rule was added or changed, the objects that got no new or updated rule, and deleted objects. Each analyzed object shows what the run did for its rule next to its tag: Rule added, Rule changed, No rule (new object), or Existing rule kept. See Build Rules Results. Objects whose regenerated rule was identical to the one in Rules.mk aren't listed; a line under the list says how many there were. Deleted objects aren't analyzed and show no outcome, and runs recorded before outcomes were tracked show the tags alone.
Quick Edit
Quick Edit opens an editor inline in the Changed Files section. It writes to the task container, not to your local machine.
- Click the Edit button next to any file in the Changed Files section
- The editor opens with the current file content from the container
- Make your edits in the editor
- Click Save to write your changes to the file in the container and refresh Changed Files with your new changes
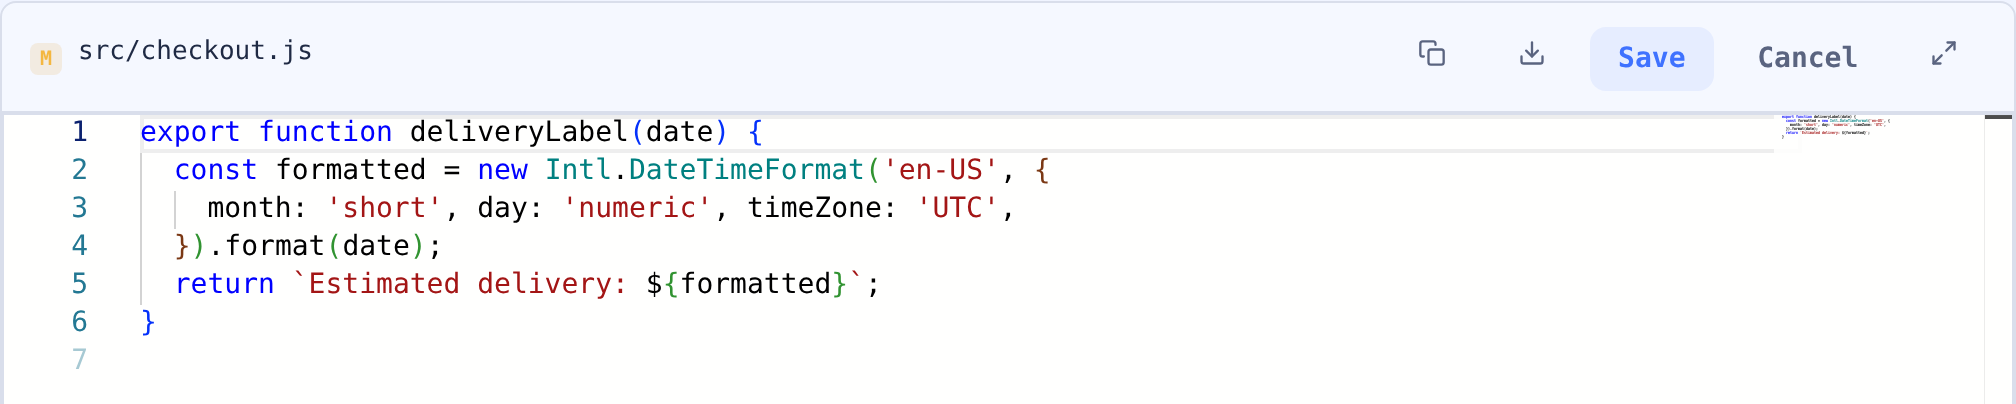
For regular text files, Quick Edit uses Monaco, the editor engine behind VS Code. Markdown files use CoderFlow's Markdown editor so you can edit docs with the same formatting controls used elsewhere in the task page.
Quick Edit supports:
- Syntax highlighting based on the file extension
- Line numbers and code folding
- Search and replace (Ctrl+H / Cmd+H)
- Auto-formatting support
- Word wrapping and minimap navigation for larger files
Editing is only available while the container is running. Binary files cannot be edited inline; download them or open the container in Web VS Code if you need another tool.
What Save Does
Saving a Quick Edit:
- Writes the new content to the file path inside the task container.
- Runs the task sync step so repository diffs are recalculated.
- Refreshes Changed Files so the diff reflects the saved content.
If the file is not present on the container's current branch, CoderFlow blocks editing and asks you to switch to the branch that contains the file.
File Browser
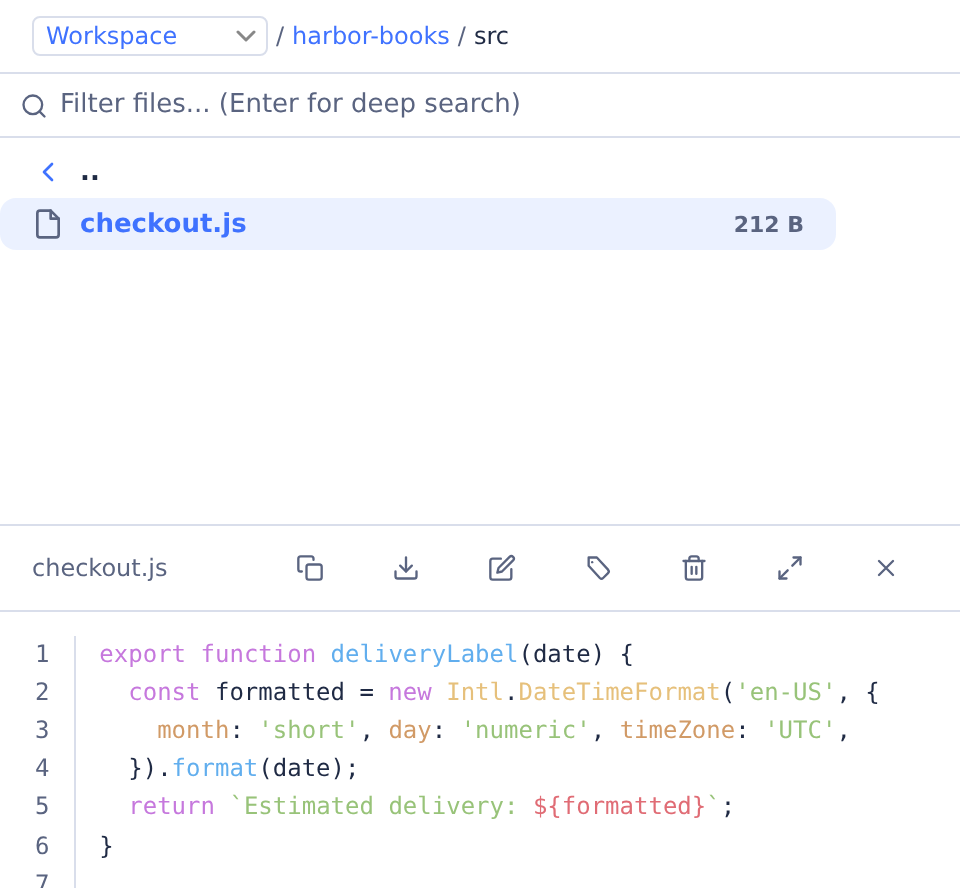
Use the Files tab on the right edge of the task page when you need to inspect files that are not already in Changed Files. On phones, tap More, then Files.
The file browser has three areas, each with its own button above the file list:
- Workspace -
/workspace, where repositories are cloned - Task Output -
/task-output, where task logs, metadata, and generated artifacts live - Container Root -
/, the full container filesystem
Clicking another area returns to the folder you last had open there. Clicking the current area goes to its top. The file browser also reopens in the folder where you left the task.
Click the arrow in front of a folder to expand it in place, without leaving the folder you are in. Click the folder's name to open it instead. Expanded folders stay expanded while you move around, and when you go back up, the folder you came from is highlighted.
The search field filters the current folder as you type. Press Enter to run a deeper filename search under the current folder.
File Browser operations use the container’s coder account permissions. Container Root does not grant administrator access: private directories such as /root cannot be listed, and saving, creating, renaming, deleting or uploading under system-owned locations such as /etc, /opt and /usr/local requires those locations to be writable by coder. Legacy root-owned folders inside /workspace are repaired when accessed; root-owned folders elsewhere retain their existing permissions.
When the container is running, the file browser can:
- Preview text, Markdown, images, PDFs, CSV, and TSV files
- Edit non-binary text files
- Download files and folders
- Upload files into the current folder
- Create folders
- Rename files or folders
- Delete files and empty folders
- Copy the path or name of any file or folder, and the text content of the open file
- Compile an IBM i source file into the task's IBM i task library, when the task has one
Hover over a file or folder for its actions: Copy path, Download, Rename, Delete and More actions. Folders download as a ZIP file. Right-click a row, or click More actions, for the full menu. It adds Copy relative path (the path from the top of Workspace or Task Output) and Copy name. On phones, Copy path and file downloads are under More actions.
The rows also work from the keyboard:
| Key | Action |
|---|---|
| Up / Down, Home / End | Move between rows |
| Right / Left | Expand or collapse a folder, or move into and out of it |
| Enter | Open the file or folder |
| Shift+F10 or the Menu key | Open the row's menu |
| F2 | Rename |
| Delete | Delete, after you confirm |
Saving from the file browser writes the file to the container and syncs Changed Files, the same as Quick Edit.
To compile, click the hammer icon beside a source file, or Compile in the header of the open file. It's offered for display and printer files, physical and logical files, RPG, CL and COBOL sources, SQL objects (such as .table.sql), message files, binding directories, and Rich Display screens in a source folder. codermake builds what the repository's Rules.mk rules make from the file, even when nothing changed since the last build. For an RPG or other module source, that includes the programs and service programs bound from the module. A dialog shows codermake's output as it arrives, then the result. If no rule builds the file, it says which rule to add. Compiling uses the file as saved: save and close the editor first. It needs permission to run the task. It can't start while the agent is working, and a message sent to the agent during a compile waits for the compile to finish.
Downloading Files
To save the current contents of a changed file from the task:
- Click the Download button next to the file in the Changed Files section
- Your browser saves the current file contents from the running task container
This is useful when you already know which changed file you want and do not need to open the full file browser or VS Code.
When to Use Each Surface
Use Quick Edit when the diff already shows the file you need and you want a narrow correction.
Use the file browser when you need to inspect, upload, rename, or edit a file that is not currently changed.
Use Web VS Code when you need the browser IDE, an integrated terminal, repository search, or edits across several files. Web VS Code changes the same container filesystem as Quick Edit; after syncing, those changes appear in Changed Files.
Use the VS Code Extension when the task is complete and you want to bring the generated patch into repositories on your own machine.
Discarding Changes
To revert changes to a file back to what's in the Git repository:
- Click the Discard button next to the file in the Changed Files section
- A confirmation modal appears with the filename
- Click Discard to confirm
The discard operation:
- Uses
git checkoutif the file exists in the repository's HEAD commit - Removes the file entirely if it's a new file that doesn't exist in HEAD (handles staged and untracked files)
- Updates the Changed Files view to reflect the removal of that file's changes
After discarding, you can immediately see the updated diffs. If you discard all changes to a file, it disappears from the Changed Files section.